
IMPORTANT: Doing any of the modifications on this page, especially the one to the power circuit, are entirely at your own risk.
Preamble:
My waned love for the Dreamcast was recently rekindled due to a desire to play Crazy Taxi. I connected it all up, and got my games out. Alas, the Crazy Taxi disc was missing. As I have a launch model, it runs backups without needing a boot disc, but I had to wait while the burn took place, and then cross my fingers that it was successful. I used to have a fairly good original game collection, but sold a lot of them long ago (the most familiar of woeful tales to so many of my generation). Most of the games I sold are obviously the ones I want to play, too. My PAL version of Rez was parted with during a desperate period of my life for about a tenner. Oh, the regret!
Not only are the optical discs themselves deteriorating, but the laser units in the GD drives also have a finite lifespan, and repairing them could become costly, if parts even keep being made. Burning fresh copies of games solves the first problem, but not the latter. Step in, GDEMU…
A word on clones:
…or in this case, step in GDEMU clone. I’m not going to get too deep into the politics of this; I know clones are a shady industry, and suck for the originator of GDEMU. I’m also a creative, and have seen my work plagiarised so that somebody else gained commercially. It’s not a good feeling, but one has to move on, and accept that it will happen. As individuals, we don’t have the legal means to fight every wrong against us. I couldn’t let it stop me creating, but everyone is different. We live in a capitalist world, and cloning in different contexts has been happening for as long as humans have been making stuff (flint arrowhead, anyone?). That’s not justification for it, but it always has, and always will happen. It’s just that our modern understanding of intellectual property is vastly different and more developed than that of our ancestors.
That said, if you want to buy one from the inventor, he opens pre-order queues periodically, and the official site can be found here. Indeed, the installation pages he has helped me out, so do visit it. And like I say, if while you’re there your moral compass settles, please do support him and buy an original.
As a small concession to the creator, I won’t link to the one I bought, but if you want one, you’ll be able to find listings easily enough.
EDIT (June 2020): You almost certainly know this, but the same person who makes the GDEMU makes the Rhea/Phoebe boards for the SEGA Saturn. I managed to secure a genuine Phoebe from his last round of pre-orders, so balance in the universe has been restored! You can read my install guide for that, here.
Now, on with the installation…
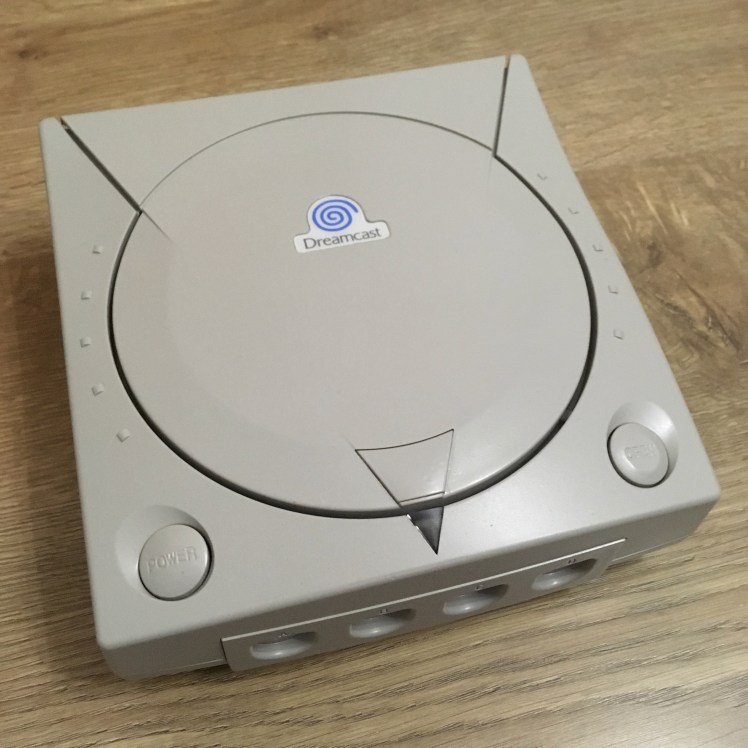
Do you have the right Dreamcast:
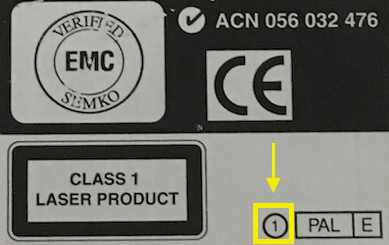
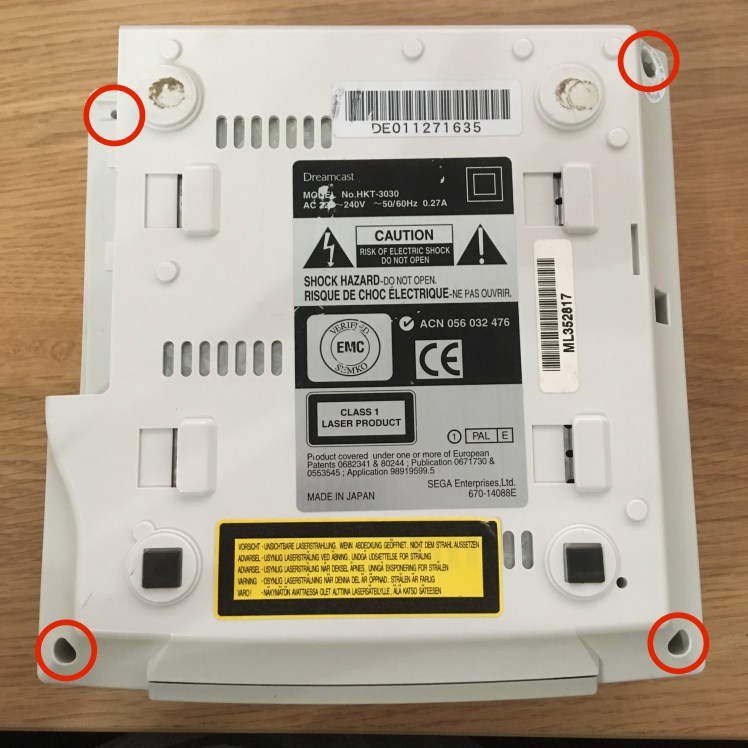
IMPORTANT: There are different models of Dreamcast, and the GDEMU will ONLY work with the VA1 model (also known as the second generation). The easiest way to tell if yours is a suitable model, is to look for a number 1 in a circle on the label on the underneath of your Dreamcast, like this:
Most second generation models also have a black plastic fan that you can see through the vent grills on the side, whereas first gen machines have metal fans.
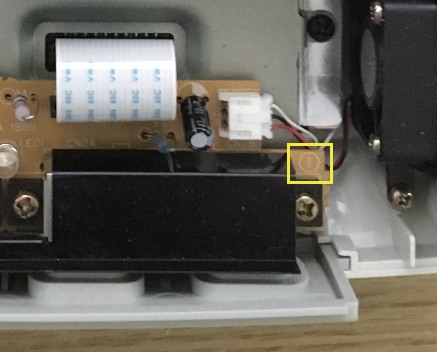
If you suspect the case might not belong to the board inside for some reason, you can also verify it by looking for a 1 in a circle on the board attached to the joypad ports, like this:
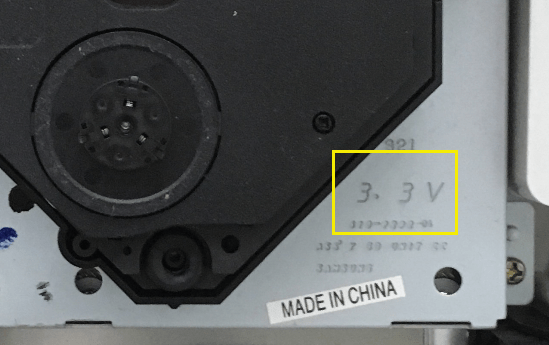
Finally, you can confirm a VA1 model by the 3.3V stamped on to the metal plate of the GD-ROM drive assembly, as seen here:
Disassembly:
Ignore the state of the Dreamcast, this is my spare (I’ll be leaving my original launch day machine intact), and I’ve spray-painted it! I never usually advocate paint-jobs on hardware (unless it’s to restore original colours, as I did for my Atari 800XE), but this was really yellow and grimy. Picture of what it looks like at the end!
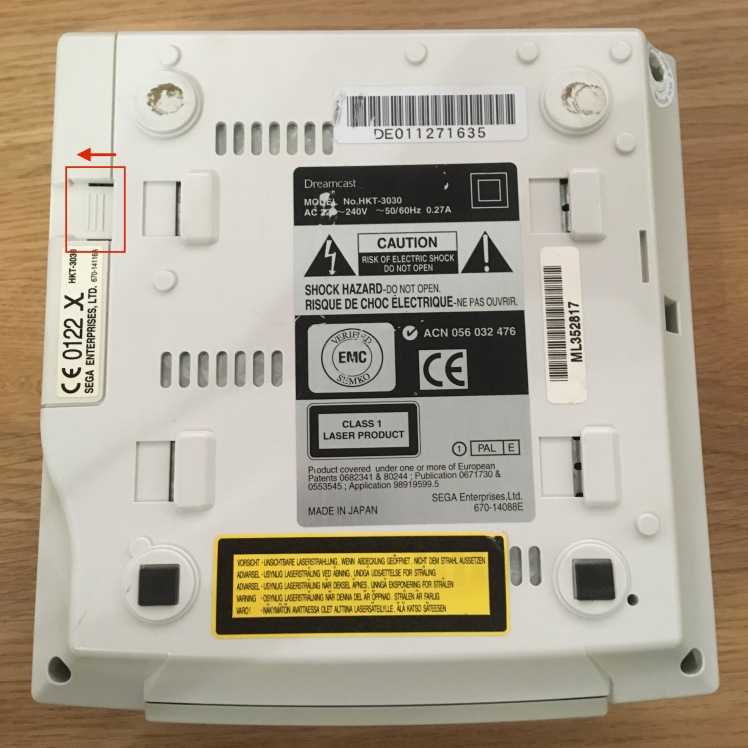
First of all, turn the Dreamcast upside down and remove the modem by pushing gently in on the ridged thumbgrip, and sliding out.
With the modem removed, unscrew the four corner case screws:
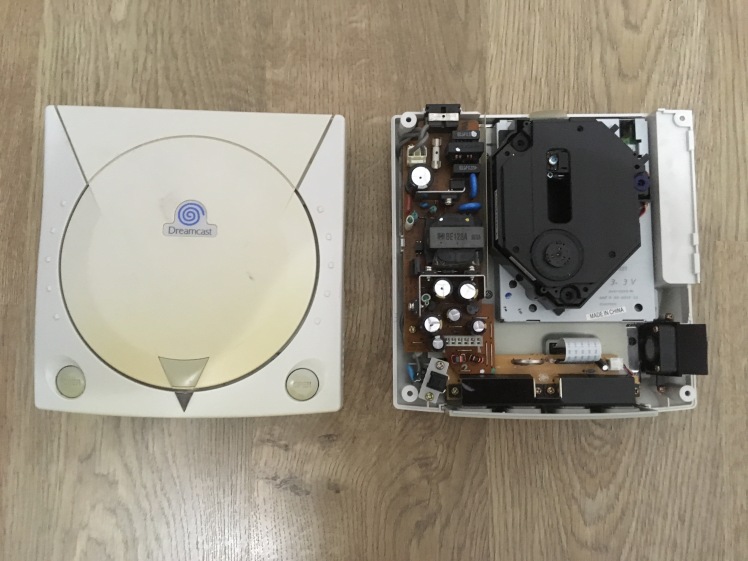
Holding the two halves of the case together, turn the Dreamcast back the right way up and gently lift off the top cover.
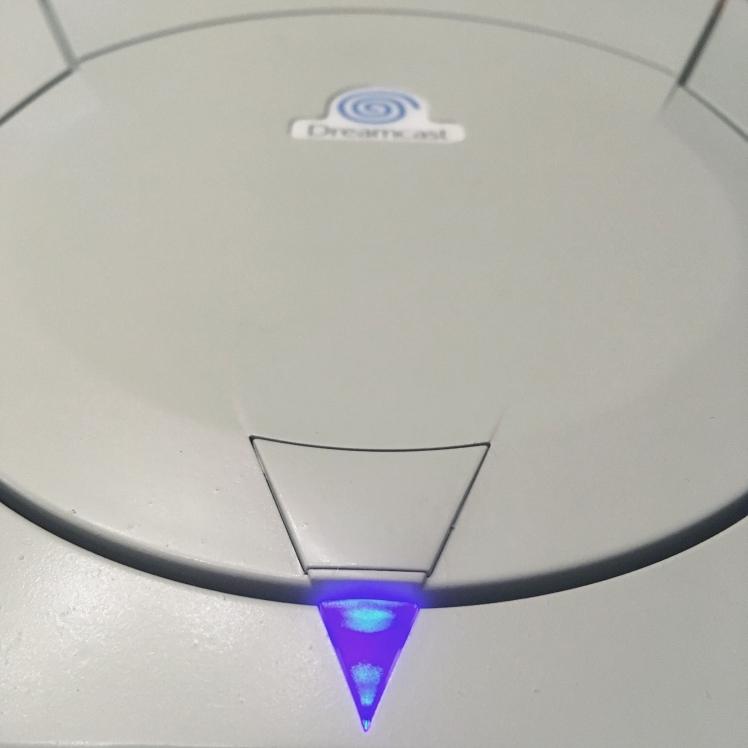
This is a good time to check the capacitors for visual signs of expansion. Mine were fine, but knowing the battery had died, I changed the soldered-on one for a holder for ML2032 batteries (ML2032 are rechargeable, so CR2032 batteries (which are not rechargeable) should NOT be used), and I also changed the orange power LED for a blue one while I was in there. To do those mods are VERY simple – and just require very basic soldering skills.
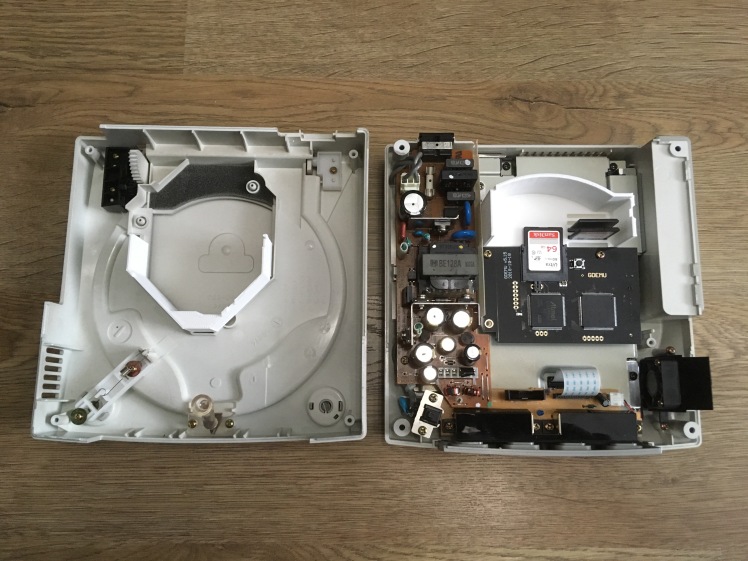
Next step is to remove the drive assembly. Unscrew the three holding screws:
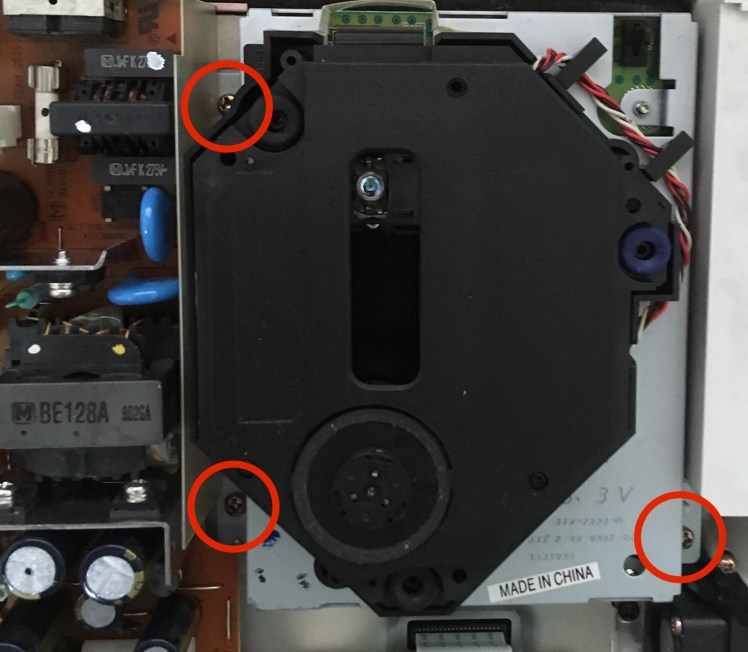
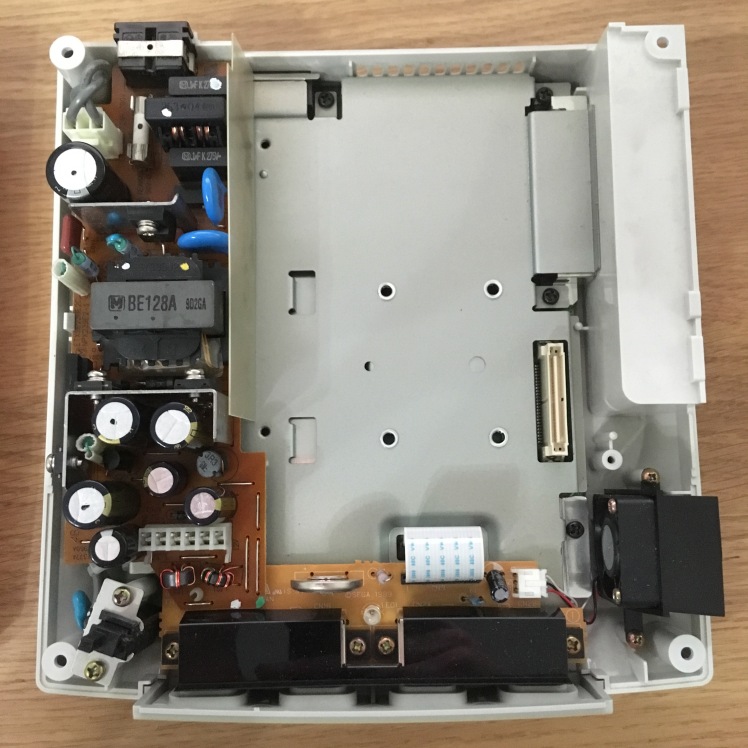
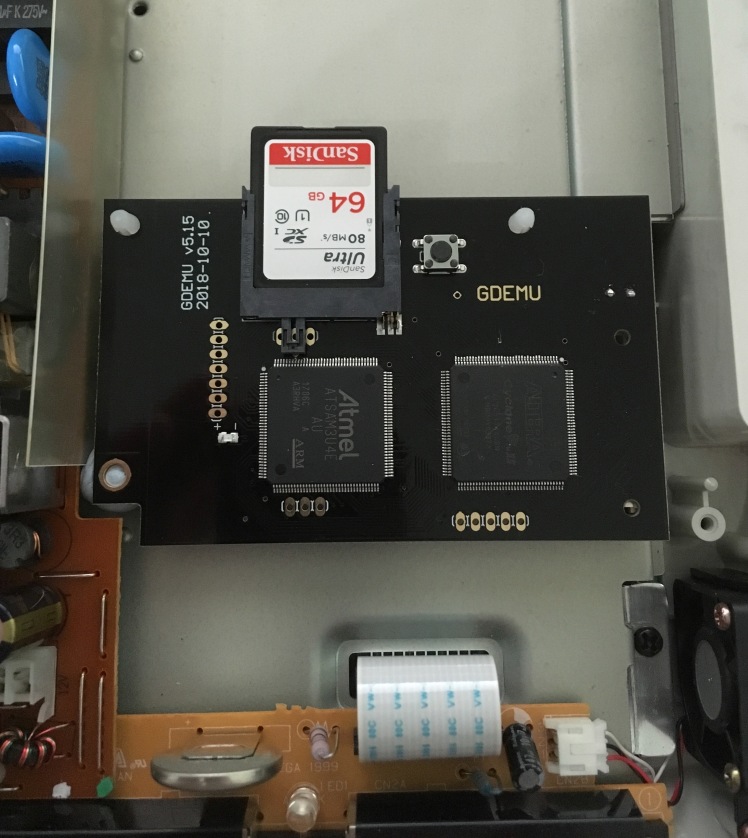
Now, without twisting or tilting the unit, and holding either the metal cage, or the smooth black plastic outer wall, lift the unit straight up and out. The pin connector is bottom-right as you look at the picture above, close to the screw hole. You’ve now exposed the connector:
Installation:
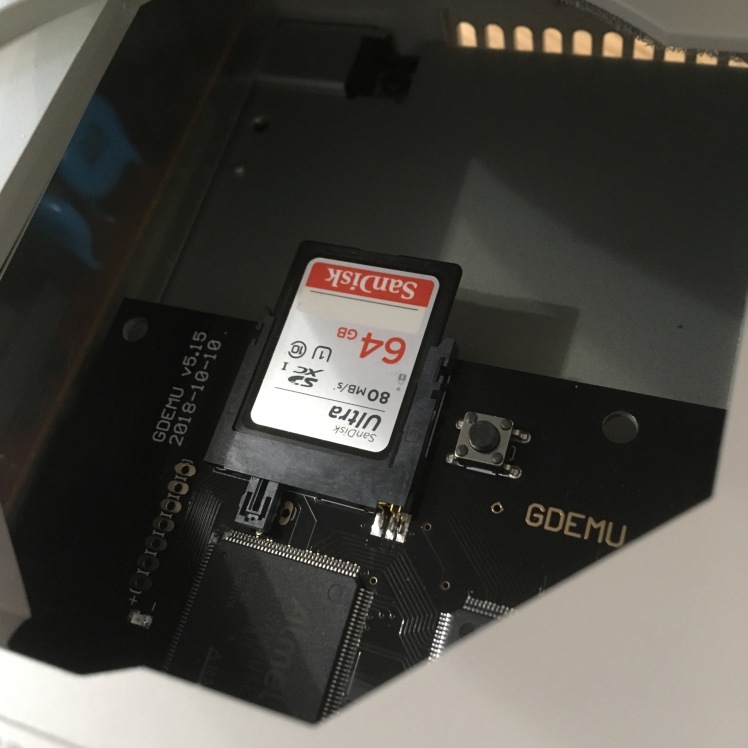
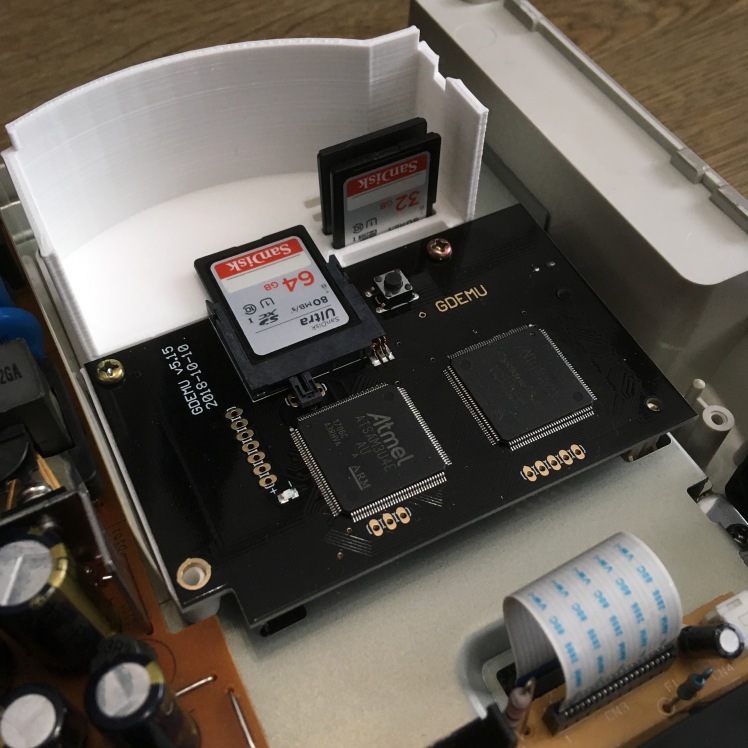
Put the two plastic standoffs into the top edge of the GDEMU board, before lowering it into place. The instructions for the original GDEMU say that the bottom-left hole needs an M3 20mm screw with button- or pan-head. This would work, but you’d need an appropriate standoff (which I didn’t have). Also, my clone board didn’t come with a screw for that hole at all, but – and I do this often – Blu-Tack makes for a great temporary support until you can find the right part! Again, try not to twist, tilt, or bend the board as you lower it.
With the 3D-printed tray I fitted (see later in this post) I found a solution.
At the end of this post I’ve put details of the 3D-printed ‘tray’ I’ve installed. There are a variety of designs people have created – I’ve gone for one with integrated SD card storage slots. That will allow me some degree of easy categorisation of GDI files on different cards.
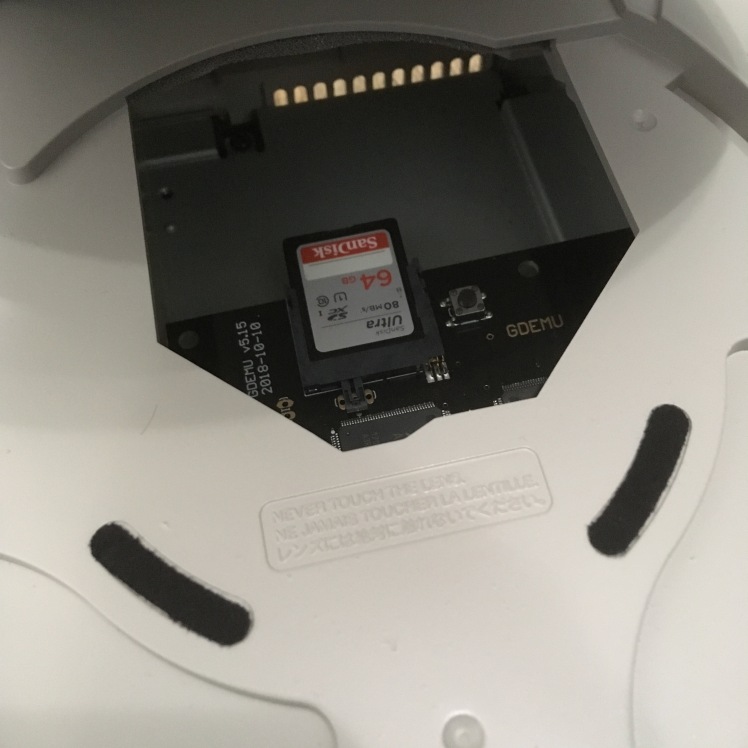
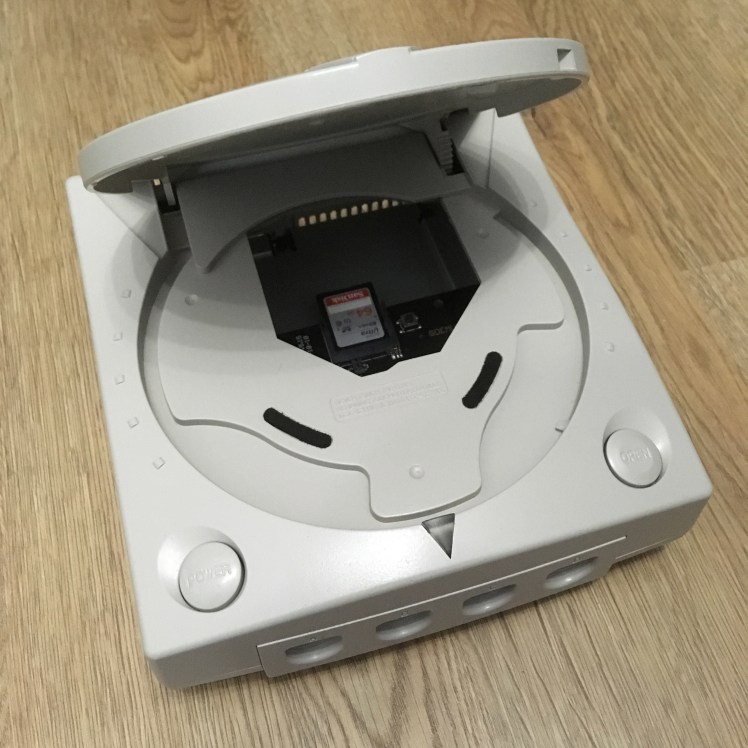
Put the lid back on your Dreamcast, carefully turn it over, and put the four corner screws back in. You can slide the modem back in now, too.
Keep the GDROM drive safe, and particularly the screws!
Optional (but recommended) power modification:
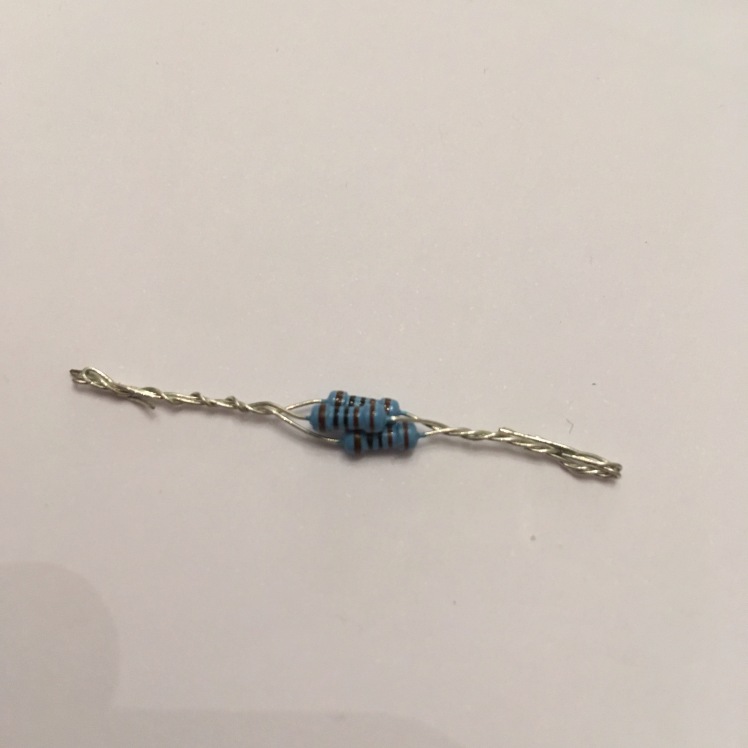
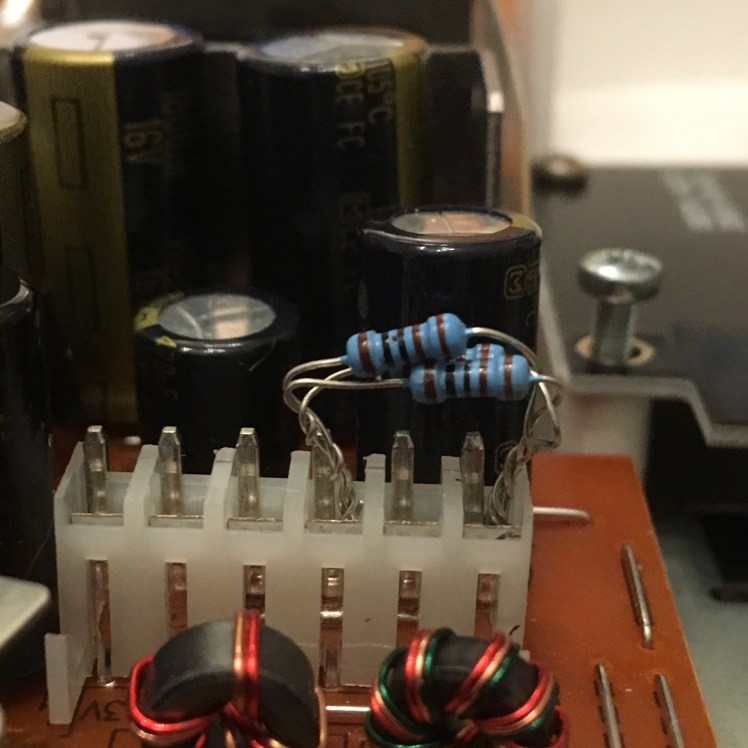
With the GD-ROM gone, the 12V rail that powered it is no longer having that draw on it, so can output up to 14V, causing your Dreamcast to get very, very hot, and may shorten the lifespan of components. The 3D printed tray I’m fitting will help airflow, but if you’re not fitting one, some people recommend you put in some paper to help the fan draw air correctly over the PSU, as can be seen in this crude example. To rectify this effectively, a simple mod adding some resistors will bring the voltage back down. This information originally came from this post, and at 01:40 in the second video down the page, you can see where it needs to go. Further discussions with two awesome people, one an electronics expert, have made me alter the modification slightly. He advised that a 300ohm 1/4W resistor isn’t really going to cut the mustard as it will itself get too hot. If you’re going to go for a single resistor, 1W is better. Further to that, 330ohm is better than 300ohm as it will lower the amperage output, and that’s what’s going to make more difference to the heat generation. Even better than that is three 1Kohm 1/4W resistors in parallel (creating a resistance of 333.33ohm), as the load is shared between the three.
Software and SD card preparation / filling:
You’ll need an SD/SDHC card, or Micro SD/SDHC card with an adapter. Good quality cards are recommended, and I’ve had success with the SanDisk Ultra cards as pictured above. The official technical requirements for the cards are:
SD: 512MB, 1GB, 2GB
SDHC: 4GB, 8GB, 16GB, 32GB
4GB SD cards are NOT supported. I use a 64GB card with no problems, and others have used 128GB successfully, too.
Ensure your card is formatted as FAT16 for capacities up to and including 2GB, and FAT32 for 4GB and above. Lots of SDHC cards will come pre-formatted as ExFAT so will need to be reformatted. The SD Association’s own software will auto-format to ExFAT and so you may need to use alternative software, or just directly from your OS.
You can fill your card manually (see instructions on the official site), but by far the easiest way is with a piece of Windows software called GDEMU SD Card Maker. You can click here to download version 1.10. Supported file formats of GDEMU are GDI, CDI, CCD+IMG+SUB, MDS+MDF, and ISO. I’ve successfully used GDI files in folders (they must be in folders) and CDI files, but haven’t tried any others.
One thing to bear in mind is that GDI files (and their associated folder of contents) can be an entire rip of a GD-ROM, so the file size once on your SD card will be just over 1.1GB each. These can be trimmed with other software, or many CDI files only have data actually used so will be smaller, but some may not work. I use original GDI rips to try and achieve the highest compatibility I can, and SD cards are cheap enough at the moment that I don’t mind having multiple cards to fit on the games I want.
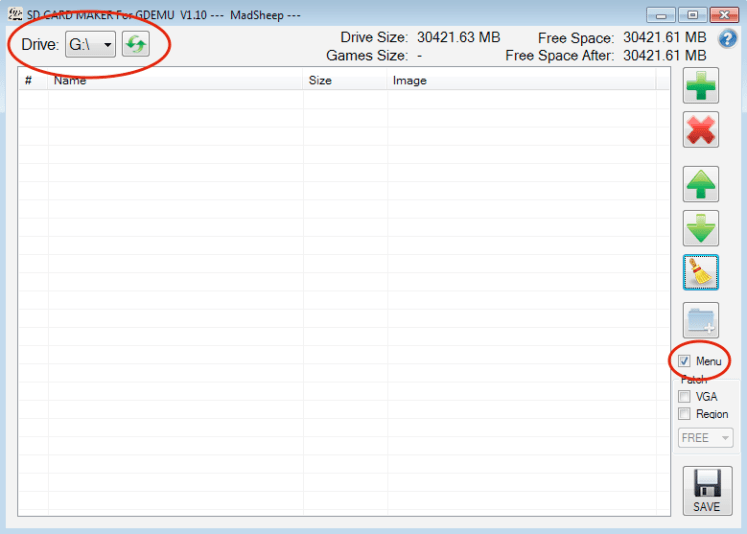
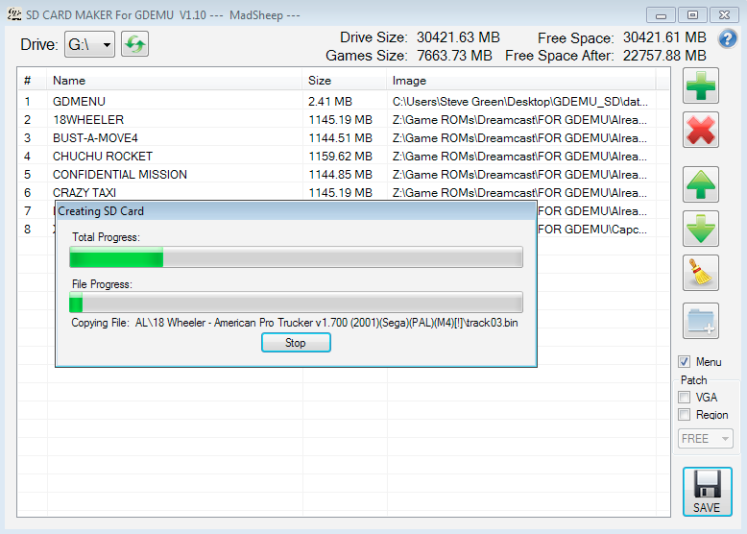
When you open SD Card Maker, the first thing to do is make sure that your SD card is showing as the corresponding system drive letter in the top left. Next, tick the ‘Menu’ checkbox in the bottom right. This runs a patch that can prevent the game list from taking a long time to appear on your Dreamcast. Sometimes it works, sometimes it doesn’t!
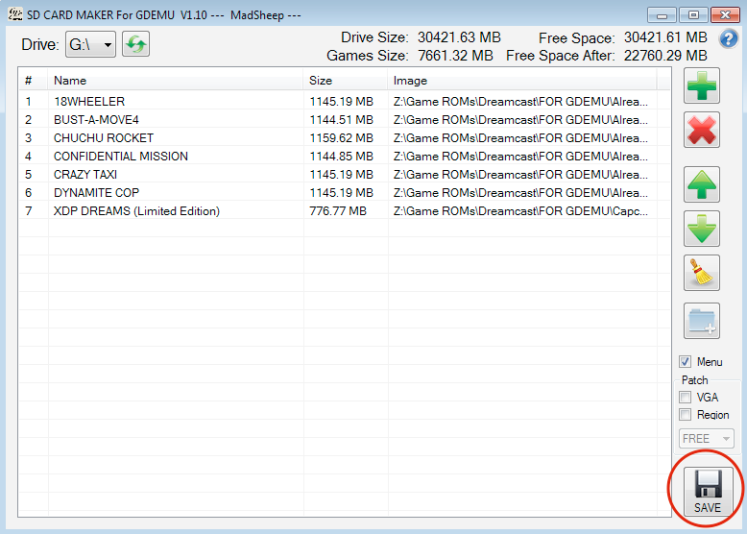
Next, add your games. You can either press the green plus symbol in the top right to add via a file browser, or you can just drag and drop files into the list.
At the top right of the window you’ll see ‘Free Space’, telling you the capacity of your SD card, and just underneath, ‘Free Space After’, telling you the free space that would be left on the card if you finalised it with whatever is currently in the game list.
Two things to note on file naming and ordering. You can reorder them by:
- Using the green up and down arrows to move the selected title up or down one step at a time.
- Drag a title and drop it where you want it to be.
- Click on the ‘Name’ header to sort the entire list alphabetically, A-Z, or Z-A.
- You can add an empty folder using the blue folder with a white ‘+’ icon on it which will act as a separator, so that you can group titles.
NOTE: At this stage, some names will be different to the folder name (or filename in the case of CDIs) that you added. In the worst cases, when the files have not been tagged you will see a blank entry in the list, or they may be tagged with something they were built from, for example a homebrew game may have used an Official Dreamcast Magazine coverdisc as its basis and may still have that tagged name! You cannot rename titles in this section of the application, but in the next you can, so its important that you make a note of which position your titles are in so that you can name them appropriately in the next step. In addition, be sure to place the titles where you want them to be AFTER you have renamed them in step 2, as you can’t reorder them there.
Once you’ve put what you want on the card, and sorted them appropriately, click the big ‘SAVE’ button in the bottom right.
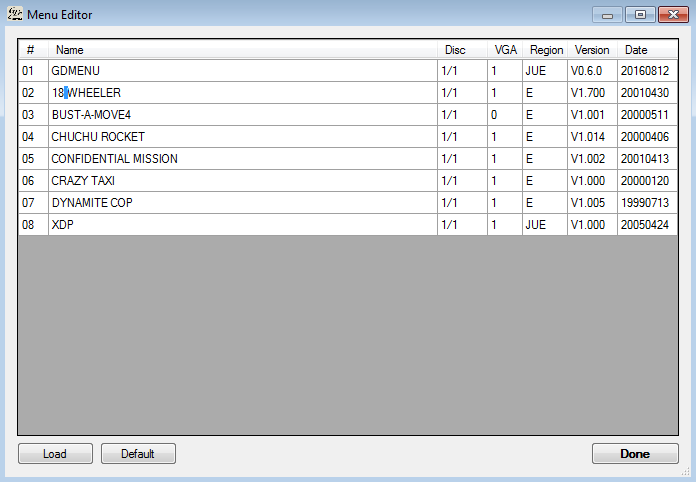
You will be asked if you want to customise your menu. If you want to rename any of the titles, then say yes. To rename, click into the name field and overtype. IMPORTANT: The software will place a new item, ‘GDMENU’ at position 01. Leave that as it is. When you’re finished, click DONE.
The software will fill your card:
Once it’s finished, you should see this message:
The first time I did it I got an error message like this:
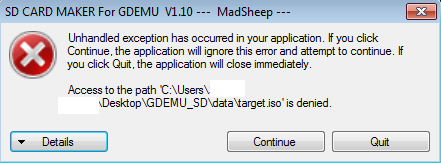
I believe this was down to my antivirus software – creating an exception in its block list seemed to fix it. In any case, this error does not impact the SD card in any way, that is OK to use even if you see this message.
Within the SD Card Maker folder, you’ll find a readme for the GD MENU software that it installs on your card, and is what you see when you boot the Dreamcast. I highly recommend reading it as it gives key combos for resetting the system and information on region settings / VGA output, and it can be found here: GDEMU_SD > data > files > readme.txt. I’ve also made it available at this link.
As a TL:DR, though, two useful bits of info: In-game reset, hold A+B+X+Y+START. Some games will make this first reset to their menu, and you do it again to go back to GD MENU. The other is that the software skips the BIOS region check, so in almost all cases, it doesn’t matter if your game files are PAL or NTSC, the system will play them with no specific patching required.
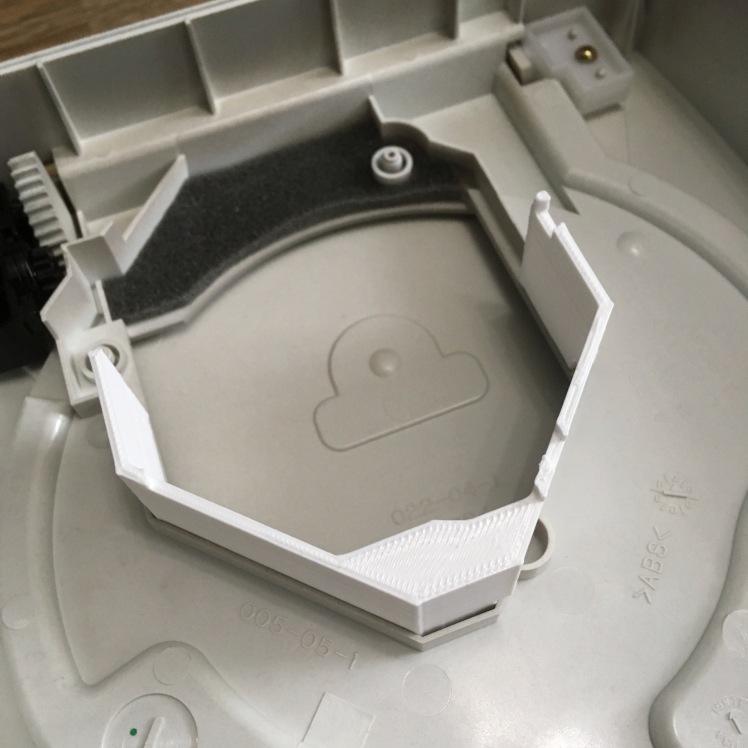
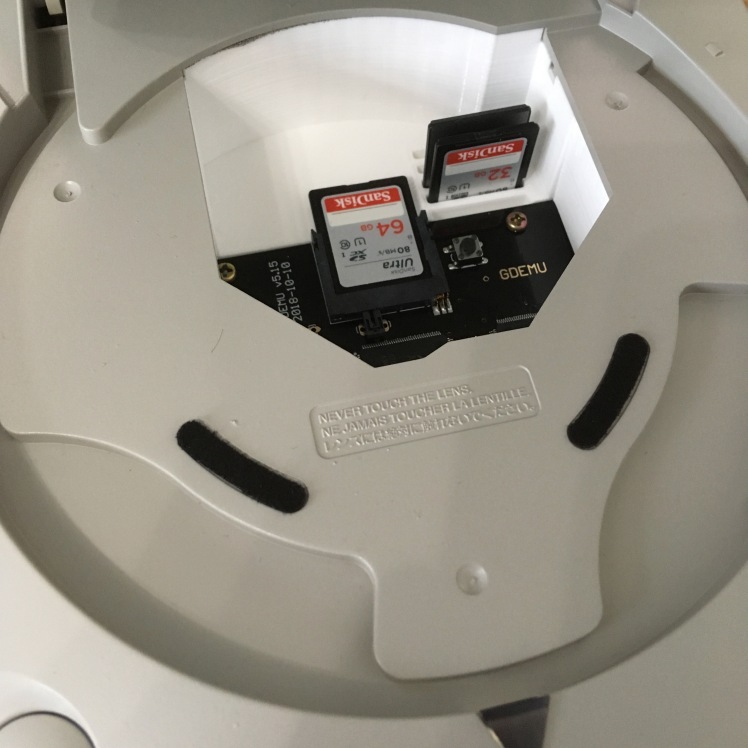
3D-printed tray:
As mentioned earlier, rather than leave the board ‘bare’ inside the DC (where it can be easy to drop and lose the SD cards inside the case!) I had this tray made. The creator has options for SD slots on the left, right, or none, and it also mimics the shape of the original GD-ROM drive to try and create the original airflow for cooling. The storage slots are great, and it gives it a nice, purpose-built look. I’m just sad I’d already ordered it in white before I decided to spray the DC!
That annoying bottom left hole? Now there’s a built-in standoff on the tray, an M3 16mm with the bottom half of a screw cover (like those used on car registration plates) acting as a spacer was a perfect fit.

Game on!
…
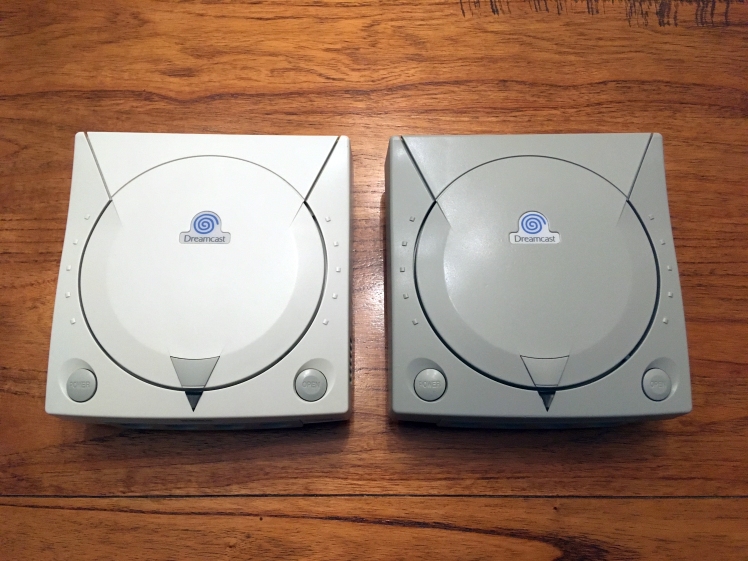
And for those interested, here’s what it looked like after the spray job and LED change!
Here’s my untouched launch-day model next to the sprayed one:

Great article! Helped me out, but as a lil follow up…. How did the three resistors work out? Is the system running good yet? Relatively cool?
LikeLiked by 1 person
Thanks, glad it helped! And yes, so far so good. Runs cool enough that I don’t think it will be an issue.
LikeLike
I was having issues with mine, so I purchased the very same card you used in your tutorial. It now works like a dream, so thank you!
LikeLike
No problem, glad it was of use!
LikeLike
Hey i have a quick question about the resistors. Would you be able to replace the 3 x 1/4W 1K ohm resistors with 3 x 1/2W 1K ohm resistors? Would that be too much in terms of wattage?
LikeLike
That should be fine. 1/2W resistors are able to sustain a higher load, so all you’re doing is making sure they won’t overheat and catch fire, not reducing the throughput.
LikeLike
Thanks @retrogameultra, I will be making a video for my Youtube channel and be sure to give you a shoutout!
LikeLiked by 1 person
Just posted my video. Thanks for your help man! I referenced your page in the video and linked in the description. 🙂
LikeLike
Watching it right now! Thanks so much for the shout-out and link – much appreciated, and your DC looks great now!
LikeLike
Hi , ive just fitted this too a version with a metal fan , it seems the outer case was a VA1 but the insides were the earlier type. is there a reason it wont work with the earlier model ?
Thanks
LikeLike
A quick trip to the creator’s page would have told you not to fit it to that! It’s why I gave internal visual identifications for generation determination too, relying on the case isn’t really enough: https://gdemu.wordpress.com/details/dreamcast-details/
LikeLike
Yes thanks for the reply , i done a little research last night and discovered its because the original DC GDROM runs on 5v instead of 3.3v . Luckily i was reading your blog last night and noticed.. oops , i do have another 3.3v PAL DC here with plastic fan so i will be installing it in that one instead now.
Cheers
LikeLiked by 1 person
Hi again 😉 im just loading the sd card up now and ive noticed you dont have region or vga patches ticked ? is it needed as ive read somewhere else this gets done automatically.
Thanks
LikeLiked by 1 person
I’m not an expert on the software, but I know GDmenu region patches on the fly, so you don’t need to have that ticked, but I think if you have games you specifically want to output as VGA you need to tick that one. Obviously if you’re not using a VGA connection you don’t need to tick it at all.
LikeLiked by 1 person
Hi men,one question, Is it the same GDEMU speed as the GDROM? Are the games just as fluid or is there any reason to worry?
LikeLike
Load times are faster with GDEMU: https://www.youtube.com/watch?v=j_cXpJP1tC0
LikeLike
Hello, how about 2-4 disc games?
How add them and how swap discs in game?
Whats more… Is there a way to name them right in menu or does menu read it from dumps?
LikeLike
You can swap discs by pressing the physical button on the GDEMU. If it is the next disc on the card then you don’t need to do anything else. For games with a lot of discs, like Shenmue, I put them on their own SD card so that there are only four discs to swap between. You can name the files in stage 2 of the SD Card Maker software, but as far as I know, you cannot rename them from the GDEMU menu on the console itself.
LikeLike
I believe I succeeded in cooling Dreamcast without making any modifications to the source, it is very simple to do and the only necessary tool will be scissors, but to understand what I did I will have to try to make a video or a photo tutorial. The fact is that you can clearly notice this efficiency in heat removal with placing your hands where there was overheating. As soon as I have the explanation I’ll post it for you to test.
LikeLike
Here is my solution for overheating, for anyone who wants to test:
https://thenewdream2019.blogspot.com/2019/10/improving-dreamcast-air-circulation.html
LikeLike
I’ve included your comment for the interest of other people, but don’t forget that the resistor solution is NOT removing components or altering the DC in any other way.
LikeLike
ok, but my concern is to circulate the air and get hot air out of the case.
LikeLike
Absolutely, and your method may work. As I am also using a 3D-printed case which routes the air appropriately as in the original DC design, I don’t really need to implement it though!
LikeLike
I think it is ideal to use all the options, 3D print, resistor and aperture to improve circulation in the font region because they are easy to implement and complement each other. I think the 3D print will not favor the air exchange of the power source, but the goal was mainly to cool the heat generated by the GDROM and removing it alters the area of higher heat concentration.
LikeLike
man thanks a lot.
i came across this website, because i was searching for a way to play mame games on osx, but now i can revive my DC!!! HOLY SHIT, AWESOME!
my disc drive died maybe 3-4 years ago and since it is sitting in my parents basement i never thought of getting it back runnning. but having such a great way to play the games again and so convienient… that would be awesome.
LikeLike
No problem! Glad to have spread the word, and thanks, you made my day! Good luck with the DC, and be sure to check that it’s the right revision before you do it!
LikeLike
Since the Dreamcast community is always sharing something, I decided to share a spreadsheet, which took me a long time, with information about 300 games to make my life easier when choosing what to put in each SD. For those interested in this post I explain what I did and make the spreadsheet available for download:
https://thenewdream2019.blogspot.com/2019/11/organizing-dreamcast-games-in.html
LikeLike
Thanks for sharing!
LikeLike
I just wanted to confirm that the three resistors you show in the pictures are indeed 1k ohms. Because when I look up that five band color code the result is 110 ohms 1%. You mention using 3x 1k ohm resistors in parallel so I’m a bit confused. The ones I’m looking at purchasing are brown/black/red/gold which are 1k ohm 1/4w 5%.
LikeLike
Yes, they’re 1k ohm resistors. The five band code for them is Brown, Black, Black, Brown, Brown. You should be fine with your chosen 4-band ones, as the value is the same (barring tolerance, obviously).
LikeLike
Ok thanks! So the ones you’re using have a tolerance of 1%, the ones I’m looking at are 5%. Do you think that makes much of difference considering the application? TIA
LikeLike
I’m no electrical engineer, but I would think that tolerance is probably fine.
LikeLike
can you tell me the difference between putting a single resistor of 1/4w 330 ohm and putting 3 resistors of 1 4w 1K ohm, what is the difference?
LikeLike
It’s described in the text. Using three 1k ohm 1/4w in parallel splits the load across the three and should reduce heat even further.
LikeLike
Using 3 x 1k ohm 1/2w (brown, black red, gold) instead of 1/4w, should work or could cause a problem with a pal DC? thanks in advance!
LikeLike
Yes, that should be fine as you’re just using resistors that can sustain a higher load.
LikeLike
Hi
Great tutorial, really helpful. Just a quick question on memory cards. Would this this card be suitable:- SanDisk Ultra 128 GB SDXC Memory Card up to 100MB/s, Class 10 UHS-I.
Thanks
LikeLike
I’ve used the 64GB version of that variant and it’s fine. You might experience a longer delay in the menu appearing on screen with a larger capacity card, but there’s no reason it won’t work.
LikeLike
what is the maximum sd card i can put?
LikeLike
Some people have successfully used 256GB but it will take a long time to load the menu and compatibility cannot be guaranteed.
LikeLike
This is a great guide is fantastic and will save people a lot of time.
Having done this a while back I can share my experience. I have used 128gb full size sd cards. When fully loaded they can take time to load but have no issues with them. I am based in uk and tend to use mymemory to avoid fake cards. I use a 128gb kingston canvas select sdxc class 10 (1) Cards is Green . I have also just started using a Sandisk Ultra 128gb sdxc (10) (1) 80mb/s
You must first format them to fat32.
I also replaced the fan in mine so more silent. I also replaced the power supply with a pico instead.
The fan and power supply i got of amazon. The mod kits 3d printing ebay is best.
The clones dont update the firmware. Also they can be fussy on which version of gdmenu you use. If say you only see a few folders try a different version of gdemu in the first folder.
A 128gb card will get you 100 decent games !
LikeLike
Where can i find all the versions of the gdmenu? because my gdemu isnt working. I can play the games, but only if i press the button in the board, but the menu isnt showing. I Thought that it was a defective board but isnt, i’ve bought another gdemu and isnt showing the menu too. Help me please!!!
LikeLike
I’ve tried two different GDEMU clone boards and they work fine with the GDMENU software linked. Are you sure you’re ticking the ‘Menu’ option when creating your card?
LikeLike
@retron, yes i did check the menu option.
LikeLike
I just want to give a helpful tip for anyone who has loading time issues with the menu. I am using a 512GB card loaded with 345 games and my menu loads in less than 2 seconds. Here’s the secret: when you use SD Card Maker check the menu box when you set it up like normal and rename any games that you need to and save. Immediately after that uncheck the menu
LikeLike
Hi Dave I am altering my set up later so will give it a go. Do you re-save after you have quickly unchecked, or just quickly exit the app.
Also out of interest what card do you use, as I am spread over a couple of 128gb’s at the moment ?
I downloaded a 128gb image and that worked a lot quicker then mine !
LikeLike
I use a PNY Elite Performance. I save a second time before exiting the app. Please let me know if it works for you. I’m hoping it’s not just a glitch that only worked for me.
LikeLike
Right.
For myself I have two SD cards both 128 gb
One boots into the menu in around 3 seconds.
The other takes 52 seconds.
One is a pack I put together (52 seconds) and another is a downloaded pack (3seconds) then with all the folders copied to a card I formatted to fat 32.
The one I put together I re-formatted the card and started from scratch, yesterday and even clicking menu, save and unchecking etc etc It still takes 52 seconds. Thats with a brand new format and reloading all the CDI’s all 105 of them !
Then I actually deleted all the data of the second card and copied the files from 52 second card across without folder 001 and ran gdemu. That then took 52 seconds to load up when places in DC.
As I know that card can boot in under 3 seconds it deffo has something to do with the menu tool.
Both cards are formatted the same and the file in 001 folder is about the same size.
So whoever or however the person who who did the DC pack, they got it working great !
For me maybe its a windows 10 thing or the gdemu I am using is not quite doing as it should for whatever reason. I know its working and saving as I can make my own menus with it too
I am using one from download link which is Mad sheey v1.1. I cannot believe there is not another tool out there to do the same job !
I can put up with the wait. I am old school and remember games like Brian Bloodaxe, not only taking ages to load, but were fussy to say the least !!
Cheers.
LikeLike
Hi I’m totally new to this but thought ok installing a gdemu should be easy so I’ll give it a blast. Haven’t ordered it yet cos I wanted to make sure I had a compatible model and that’s when it got confusing. The Dreamcast i bought on eBay works fine with discs but the components all seem to be from Versions 0, 1 and 2 so I’m unsure.
I guess it might be a working Dreamcast that someone has cobbled together from different versions but I’m concerned that I i buy a GDEMU it will break it or not work.
Sticker on bottom says PAL 1
Circuit board next to controller input says 2
GDROM says Japanese made (implying 0?)
Fan is metal implying 0 but no heatsink implying 1 or 2?
Large circuit board on left says V01 (so one?)
LikeLike
It’s difficult to offer any clear advice without seeing pictures, but it does sound a bit Frankenstein’s Monster! You could also remove the shielding right down to the motherboard. On that, along the front edge nearest the controller ports you should have text that tells you the board revision and would say something along the lines of ‘Katana Main VA1’ – or VA0 / VA2, obviously.
LikeLike
Hey I’m new to all this and just got my gdemu dreamcast but cant find a working version of Windows software called GDEMU SD Card Maker they all say it has a virus,
LikeLike
Google will probably give you false positives. Bitdefender finds no virus in the file I link to above.
LikeLike
The problem is that for Google Drive, if Google virus verification system finds it positive, only the owner (so you) will be able to download it, and nobody else…
LikeLike
The software is nothing to do with me, and I only provide it as a service. I’ve changed the link to a different file provider, but take no responsibility for its use.
LikeLike
I use the one retrogames links too. I did turn off AV then exclude the folder. Be interested to see how you get along. I find some DC packs you can get load a lot quicker than when I do it myself.
LikeLike
I can’t get rid of the Framework issue mentioned in the article.
Turning off Windows Defender or exclude the SD CARD MAKER exe from scanning did not solve the issue.
Any idea?
LikeLike
I also experienced it when a file I was adding wasn’t tagged properly, and it was creating some weird characters in the game list. Ensure you haven’t got anything like that happening too?
LikeLike
I’ll found the root cause, file name convention of some .bin files where not compliant to the GDEMU requirements.
Basically .bin should not contain characters expect track01 etc.
LikeLike
Hey thanks for the guide! Ive just received my Gdemu and will install the next days.
Can someone point me a link (europe) for the needed resistors or can tell me the correct description?
LikeLike
The exact values of the resistors you require are in the guide already.
LikeLike
Nelson I am in UK and bought a pack of ten from this buyer in 2018 who still seems to be going.
https://www.ebay.co.uk/itm/1-4W-Metal-Film-Resistors-1-165-values-available-20-Pack-UK-Seller-Free-P-P/263898843941?ssPageName=STRK%3AMEBIDX%3AIT&_trksid=p2057872.m2749.l2649
The legs on these are thin, so you just double back them to make them double thick.
Worked fine no issues.
But when I did a fan kit change, I changed the power supply anyhow.
Hope that helps
LikeLike
Nelson be good to see how you get on with your menu of games.
I have a pack I dowloaded which is 128gb and boots in a few seconds.
My own chosen games on exact same 128gb card still has a 1 minute 42 second boot time. Tried all versions on madsheep, same card, cannot cut it down. Wish someone else could make another version of madsheep !
LikeLike
Hey! Thanks for the link, I will order them and will try it out 🙂 Although I did not experience any heat problems (after playing 3-4 hours) until now!
Regarding the loading times. My gdemu needs about 10-15 seconds to boot. using a 128gb Sandisk SD Card, which ist about 85% full. Sticking to .gdi files for most of the part.
LikeLike
Do you have any opinion on replacement third-party PSUs for the DC? These include PicoPSU and DreamPSU. I’m thinking that getting one of those might be a better option for me than trying to modify my stock PSU.
LikeLike
Glad I found this – have an OG dreamcast from day 1 of it going on sale in the UK – been in my loft for the last 15 or so years, pulled it out and dusted it off, it all worked perfectly but I wanted to MOD it anyway – got told about this page and followed everything to a tee. Resistors are in easy, GDEMU is in, have a few issues with display output going nuts and all over the shop, still trying to figure out how to load straight to the menu as it keeps booting to a Dreamshell menu or sometimes to a black screen but after powering off 1 or 2 times it works – currently only been able to get CDi’s to work but not arsed as they play fine. Display needs a look at but sure its a simple fix.
Thanks for the walk through step by steps!
LikeLike
You’re very welcome, glad it helped. I’d suggest trying a different SD card set up from scratch with just a couple of files on to see if that gets you booting to where you need it to be. A black screen could suggest that the GDEMU isn’t quite inserted properly, or that the connector is a bit grubby. You also can’t rule out a PSU problem if you’re getting a black screen. Give the connector pins a good clean with some contact cleaner.
LikeLike
I will give everythiing a little clean this weekend, I did notice that when I was trying dreamshell orginially the screen would go insane – my only downside is that we have macs from work and no PC’s so to get everything on the SD card I did a extract drag and drop the old fashioned way instead of SD card maker – like I said, it gets going in the end and I only put 5 games on the 32GB Sandisk class 10 100mbs SD card and it works eventually. Now I see the method to your madness i’ll keep trying and checking and ill also have a look at borrowing a PC from some one to see if that makes. adiff to the SD card but I had Sega Rally 2 running yesterday fine…
LikeLike
Sir, your website has been of a great help to refine the setup and content of my GDemu 64Gb SD card and I’d like to add I particularly liked your right and accurate writen style. Lastly, SD card maker has been a great asset to help and reduce “manual effort”. Thanks a lot from France
LikeLike
Very good description. Was a great help for me. Keep up the good work. Best regards from Austria (no kangaroos here 🙂
LikeLike
Hallo everybody,
Vero happy to find this page.
Having problem with my gdemu, i got a pal Dreamcast with 1 stamped outside,
Metal fan without cooling system, 3,3 gd rom drive, 2 stamped on controller board.
Battery is dead.
Should be Va1 I think.
SD Samsung Evo plus128 gd with sc adaptor, I downloaded so image from a verified source tested and working but on mine result is
A Dreamcast logo without animation and After a few minutes go back to menu.
Looks like I found a faulty Gdemu…
LikeLike
A static Dreamcast logo indicates no drive being present. My original clone GDEMU started exhibiting that behaviour, so it could well be that your GDEMU has died, or it could indicate a problem with the drive connector itself. Try cleaning that, but I had to replace my clone in the end.
LikeLike
Thank you very much… that was the information i was looking for,i will try to get a new gdemu clone… lol post if succesfully.
LikeLike
I followed the infos on this page but my gd emu clone isn’t working.
It freezes on the boot screen with DC logo.
Sometimes it even plays the DC jingle in extra slow motion… and freezes again.
Sometimes the LED on the GDEMU is blinking, sometimes it does not even blink once…
Any idea what I do wrong ?
LikeLike
Are you sure that your clone board works? Do you have another DC to try it in? Have you tried different SD cards?
LikeLike
Hello thanks for your answer.
No, no other DC on hand and I haven’t tried with another SD card because I would like to make sure what is the problem before buying a new one
The one I use is a 32gb SDHC “class 4” from Integral brand.
I have another one but it’s a SDHC too and it’s 4gb and I read somewhere the 4gb ones don’t work with GDemu.
LikeLike
I’m having a problem where my Dreamcast plays the startup animation, but then loads right into the music player. It’s interpreting the folders as music tracks, the first one doesn’t play, but if I press the button on the gdemu it switches to the next folder. And when I hit play, a voice comes on and either says “This is a Dreamcast disc” or “Warning: Do not play this in a regular CD player” or something similar to those. How can I load into the gdmenu?
LikeLike
Create a new SD card with just a couple of games to make sure the structure works. Sounds like you’ve not built the card properly.
LikeLike
My SD card already has just a couple games on it. I used the SD maker and followed your instructions. What kind of structure error should I look for?
LikeLike
Just start again. Format your SD card, and begin the process from the beginning.
LikeLike
I finally had luck by switching to the .gdi version of the gdmenu! (it’s available on the official WordPress links page)
LikeLike
Good to know!
LikeLike
Its so much easier to use an image already done by someone. I gave up messing around as the 256gb image which is floating around does it all.
If you are only wanting to play games you own then delete what you dont own.
LikeLike
Does it might be possible to hook a bigger fan into the psu instead of the capacitors?
That would solve two problems: the small noisy fan and the absent power consumption of the gdrom.
LikeLike
I wouldn’t advise that, no.
LikeLike
Installed the 3x1k resistors in parallel as per instructions.
Heatsink on PSU board is getting pretty hot. Is this normal ?
LikeLike
It has a lot of current running through it, so it’s going to get warm!
LikeLike
For peace of mind I replaced the psu with one which uses a pico. Then also replaced the fan for a decent one which is quiter. The fan as trickiest more the button to open tray seemed stiff. But after a while was a lot better, and I dont really need to open the lid anymore !
LikeLike
Where did you get pico from?
LikeLike
You can hunt around for prices but this is one I got…..
https://www.ebay.co.uk/itm/SEGA-Dreamcast-PICO-Power-Supply-Unit/254090978777?ssPageName=STRK%3AMEBIDX%3AIT&_trksid=p2057872.m2749.l2649
I had read most problems with Pico stuff is the power supply being crap, so treat yourself, this is mine.
LikeLike
I did post full links but did not seem to get published. Perhaps not allowed to share external links ?
They were both of ebay
LikeLike
Hi! 🙂 Will SDXC cards work too, if they are formatted in fat32? I would love to use a v60 card
LikeLike
Hi. Yes. As you can see from the image in the tutorial, I am using SDXC cards.
LikeLike
That is great ! Thank you very much for the answer! Can i ask another question? I found resistors with the right amount of ohms (330ohm) but they withstand up tp 5watts… will that one work too ?
LikeLike
That would be OK and will work just fine.
LikeLike
Hi. The electrical tape wich you isolated the resistors on the PSU mod won’t harm with the glue or deform because of the heat?
LikeLike
There’s no electrical tape isolating the resistors on this mod, so I’m not sure what you’re referring to?
LikeLike
Thanks for answering.
The first picture on the 3D print-tray section, i thought i saw a black electrical tape isolating the resistors.
So, it’s no need of isolation with electric tape on it?
LikeLike
You’re right, I forgot that was there! It was only there while I was testing to avoid any issues when I was moving the supply. Once I rebuilt it that was removed. There’s no need for the tape as long as you make sure the resistors are not touching the capacitor next to them.
LikeLike
I have had no issues with resistors or using a Pico instead , My main issue has always been the time out on SD card but if you grab a decent image instead its all done on your behalf. I now only use Sandisk cards they were on Amazon a while back for a really decent price, rather than risk ebay fakes.
LikeLike
When I got my GDEMU is was £29. Now they’re over £100! Anyone seen any cheap ones, even if they are clones ?
LikeLike
They have gone stupid prices , I bought a few for less than £50 pre-covid ! The Sandisk 256 gb cards were cheap on black friday so bought a few !!
LikeLike
Hi I am having issues! Everything works well BUT when I click to play a game on the menu, it just takes me to the Dreamcast menu.. why arent any of the games working??
LikeLike
It could be so many things. Check the format of your games (should be GDI not BIN/CUE), could be settings in you .ini file (may need to adjust timings). You could also try newer software: https://github.com/sonik-br/GDMENUCardManager
LikeLike